How to Install a Garage Door Keypad in 2025: A Complete Step-by-Step Guide
Installing a garage door keypad enhances your home security and offers convenient, keyless access for you and your family. Whether you’re a DIY enthusiast or a homeowner upgrading your property, this comprehensive guide will walk you through everything needed to install your garage door keypad efficiently and securely.
What Tools and Materials Do I Need to Install a Garage Door Keypad?
Before beginning the garage door keypad installation, gather all necessary tools and materials to ensure a smooth process. Having everything handy avoids interruptions and potential mistakes.
- Keypad installation tools: This typically includes a drill, screwdriver (Phillips and flathead), wire strippers, and possibly a multimeter for wiring checks.
- Mounting bracket and screws: Usually supplied in the installation kit, these are essential to secure the keypad firmly near the garage door.
- Battery compartment: Check if your keypad requires batteries and have fresh ones on hand; alkaline or lithium batteries are commonly used.
- Weatherproof cover: Especially important for outdoor keypads to protect against rain, dust, and UV damage.
- Keypad mount: The surface or mounting plate where the keypad attaches, often included in your installation kit.
- Installation kit: Always verify the kit includes all components such as connectors, wiring harnesses, and instructions.
Confirming you have all these items ready can save time and ensure a secure, durable setup.
How Do I Prepare My Garage Door and Keypad for Installation?
Preparation is key to a successful installation. Start by ensuring your garage door opener and keypad are fully compatible. Compatibility depends on the door motor model and the type of keypad you purchased. Consult the user manual or the manufacturer’s website for specifics.
Next, examine the keypad layout and familiarize yourself with the buttons, display, and battery compartment. If it’s wireless, charge or insert fresh batteries to avoid installation delays caused by power issues.
For wired keypads, review the wiring schematic carefully. Understand how to connect the keypad cable to the door motor’s circuit board and if any power supply adjustments are necessary. Ensuring proper knowledge of the wireless connection protocols or cable wiring before starting helps to reduce errors.
What Are the Steps to Physically Mount the Garage Door Keypad?
Choosing the right location to mount your keypad is critical for both accessibility and signal strength. Select a spot near the door frame where it is easily reachable but also protected from weather extremes. Ideally, the position should offer good signal range to the garage door opener’s receiver.
Follow these steps to securely mount your keypad:
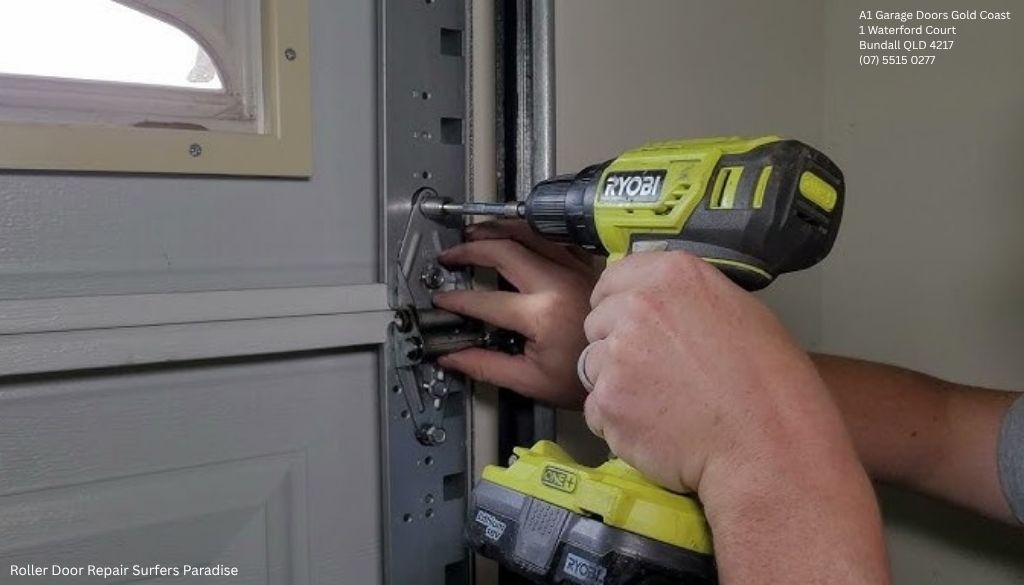
- Use the mounting bracket supplied in your installation kit as a template to mark drill holes on the chosen door frame.
- Carefully drill the holes using the appropriate drill bit size for the screws included.
- Attach the keypad mount securely with screws using a screwdriver, ensuring it is firm and level.
- Place the keypad onto the mount and fasten it according to installation instructions.
- Apply the weatherproof cover to protect the keypad from moisture and debris, prolonging its lifespan.
Ensuring a sturdy mount and proper protection will help maintain the keypad’s durability and functionality.
Our Sponsor
A1 Garage Doors Gold Coast
A1 Garage Doors Gold Coast is a Bundall-based garage door specialist serving the southern Gold Coast and surrounding suburbs with installation, repair, maintenance, and emergency garage door services. The company specializes in sectional doors, roller doors, garage door openers, spring and cable replacement, opener motor repair, smart-enabled installations, and 24/7 emergency call-outs across Robina, Burleigh Heads, Surfers Paradise, Nerang, Coomera, and the wider Gold Coast region.
Address:
1 Waterford Court, Bundall, QLD4217, Australia
Phone: (07) 5515 0277
Business Hours:
- Open 24/7 — Including After-Hours and Emergency Call-Outs
Follow Us:
How Do I Connect and Wire the Garage Door Keypad?
The wiring process varies depending on whether your garage door keypad uses a wired or wireless connection.
For wired keypads: Locate the keypad cable and connect it to the circuit board on your door motor. This usually involves identifying the correct terminals for power supply and signal transmission. Refer closely to your user manual for terminal markings and wiring colours. Use wire strippers to prepare the cable ends if necessary.
It is advisable to A1 Garage Doors Gold Coast garage door spring replacement near me check the backup power options available for your system, ensuring the keypad remains operational during power outages. Proper sensor alignment on your garage door opener is also crucial for seamless communication between devices.
For wireless keypads: Ensure the keypad has a robust power supply through fresh batteries. Wireless keypads transmit signals via a built-in transmitter that connects to the garage door opener receiver. Maintain a clear line of sight or minimal interference to improve signal quality.
Once wired or powered, double-check all connections and cables before proceeding to programming.
How Do I Program and Sync the Garage Door Keypad with the Opener?
Programming the keypad is a critical step that ensures secure and effective operation.
- Begin by entering into programming mode as described in your keypad’s installation guide. This may involve pressing the reset button or holding specific keypad buttons simultaneously.
- Set a unique security code, usually consisting of four to six digits, which will be used for access control.
- Synchronize the keypad with your garage door opener by following the programming instructions. This generally entails pressing the “learn” button on the door motor receiver, then inputting the security code on the keypad to establish communication.
- Configure user settings as needed, including setting temporary access codes or customizing keypad light behaviour for nighttime use.
- If required, use the encoder feature for rolling code technology that enhances security by changing access codes automatically after each use.
Careful adherence to programming instructions is important to prevent security vulnerabilities and to ensure user convenience.
How Can I Test the Garage Door Keypad After Installation?
After programming, thorough testing guarantees your keypad functions correctly and reliably.
- Enter the programmed security code to attempt opening the garage door. The door should respond promptly.
- Observe the keypad’s LED indicator or keypad light. These often provide visual confirmation of successful code entry or error messages.
- Test the opening mechanism multiple times to ensure consistent response and smooth operation.
- Check the signal range by operating the keypad at various distances from the door motor and adjusting position if necessary.
- Verify sensor alignment, especially if your system includes safety sensors to avoid accidents.
- If issues arise, consult troubleshooting steps such as resetting the keypad, re-synchronizing, or inspecting wiring and batteries.
Successful testing confirms your installation is complete and your keypad is a reliable access control device.
What Maintenance Tips Ensure Long-Term Durability of My Garage Door Keypad?
Proper maintenance extends the lifespan and reliability of your garage door keypad considerably.
- Check and replace keypad batteries regularly — typically every 1 to 2 years — to prevent unexpected loss of access.
- Clean keypad buttons periodically using a soft, damp cloth to remove dirt and grime that can impair responsiveness.
- Inspect and replace the weatherproof cover if it shows signs of wear or damage to protect internal components from moisture.
- Monitor the keypad display for fading or malfunction and consider keypad replacement if visual feedback becomes unreliable.
- Review user settings annually to update security codes and access privileges, enhancing your system’s security protocols.
Routine upkeep ensures your keyless entry system remains effective and secure for years.
What Are the Different Types of Garage Door Keypads and Their Installation Differences?
Garage door keypads vary mainly between wired and wireless models, with distinct characteristics affecting installation.
- Wired keypads: Connect directly to the garage door opener via a keypad cable and require running wires to the door motor’s circuit board. They offer stable connectivity but involve more involved installation.
- Wireless keypads: Utilize radio frequency transmitters and receivers to communicate with the door opener, simplifying installation by eliminating cables. Wireless models depend on battery power and may be susceptible to signal interference.
- Digital lock systems: More advanced keypads include integrated electronic locking systems and smart home integration, supporting features like multi-user access and smartphone control.
Choosing the right keypad type depends on your garage door opener model compatibility, desired security level, and willingness to handle wiring complexity.
How to Troubleshoot Common Garage Door Keypad Installation Problems?
Encountering issues during or after installation is not uncommon; here are common problems and solutions:
- No response from keypad: Check battery compartment, wiring connections, and ensure the keypad is correctly synchronized with the opener.
- Intermittent signal or delayed operation: Inspect for signal interference from other wireless devices. Try repositioning the keypad closer to the receiver or away from obstacles.
- Incorrect code acceptance or rejection: Reset the keypad using the reset button and reprogram following the instructions carefully.
- Sensor misalignment causing failure to operate: Realign sensors along the garage door track per installation guidelines.
- Keypad light malfunction: Replace batteries or check for water damage and clean contacts if accessible.
Patience and systematic troubleshooting will help resolve most issues quickly.
FAQ: Garage Door Keypad Installation and Usage
Can I install a garage door keypad myself, or should I hire a professional?
Installing a keypad yourself is doable if you have basic DIY skills and the right tools. However, professional installation is recommended for complex wiring or integration with advanced security systems to ensure safety and reliability.
Do all garage door openers support keypad installation?
No, compatibility varies with opener models. Always check the user manual or manufacturer’s resources before purchasing a keypad to ensure your garage door opener supports it.
How often should I replace the keypad battery?
Batteries usually last between 1 to 2 years depending on usage and climate conditions. Regular inspection helps prevent unexpected power loss and maintains uninterrupted access.
What should I do if my keypad is not syncing with the garage door opener?
Try resetting both the keypad and the door motor, follow the programming instructions accurately, check all wiring or wireless connections, and eliminate any nearby signal interference sources.
Is weatherproofing necessary for outdoor keypads?
Yes, weatherproof covers are essential to protect the keypad from moisture, dust, and temperature fluctuations. This significantly increases keypad durability and performance outdoors.
Can multiple keypads be connected to one garage door opener?
Many modern systems allow multiple keypads to be programmed for a single opener. Refer to your opener’s manual for guidance on programming additional devices safely.
What security features should I look for in a garage door keypad?
Look for rolling code technology, programmable security codes, keypad locks to prevent unauthorized access, and compatibility with electronic locking systems for enhanced security.
Installing a garage door keypad can significantly enhance your home or business security while offering convenient, keyless access. By carefully preparing, following detailed installation steps, and maintaining your keypad, you can enjoy reliable and secure entry for years to come. If unsure about any stage, don't hesitate to consult with a professional installer to safeguard your property effectively.

Public Last updated: 2026-06-29 05:46:07 AM