Exactly how to Choose the very best Water Filtering System
Exactly how to Take Care Of a Leaking Commode
If you're managing a pesky leaking bathroom, a couple of straightforward steps can aid you settle the problem effectively. From inspecting the base for prospective leakages to inspecting the water line and examining the flapper, there are numerous elements that can be causing the problem. By complying with these fixing actions, you'll have the ability to deal with the leakage and recover your toilet to its leak-free state. However remember, sometimes the remedy may not be as uncomplicated as it appears, so it is very important to remain tuned for additional understandings on even more complicated commode leakage situations.
Secret Takeaways
- Check for water pooling or leaking at base and connections.
- Tighten up bolts or replace wax ring to fix base leaks.
- Inspect water line for leakages and dampness.
- Check flapper for damage and replace if required.
- Readjust fill valve water degree or replace if necessary.
Examine the Commode for Leaks
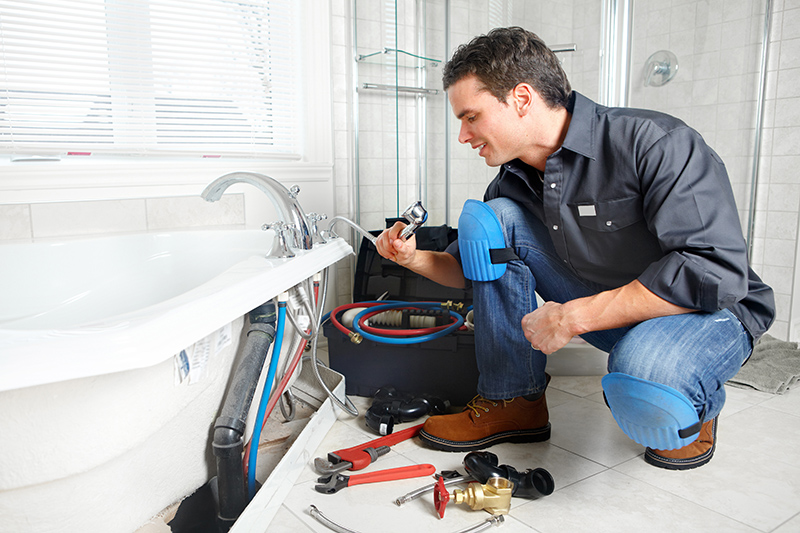
Look for leaks in your toilet by examining the base and links for any kind of indications of water merging or leaking. Leak discovery is important in determining common toilet issues such as worn-out wax seals, loosened links, or splits in the porcelain. To fix leakages at the base, you can begin by tightening up the bolts connecting the commode to the floor. If the leakage lingers, changing the wax ring may be necessary. Inspect the water line and connections for any kind of drips or wetness. Repair strategies for a leaking supply line entail tightening the nuts or changing the line completely if there are visible fractures or damage. Remember to inspect the tank-to-bowl connections too, as leakages in this field can bring about water wastefulness and greater bills. By staying vigilant and resolving leaks promptly, you can protect against more substantial problems and maintain your toilet functioning successfully.
Inspect the Water Line
First, check the water line for any type of signs of leaks. Look carefully at the links and fittings for any kind of moisture or drips. Tighten up any kind of loose connections to prevent additional leakage.
Inspect Supply Line
Examine the water line for any type of signs of leakages or damages that could be triggering the commode to leak. Begin by checking for rust on the supply line. Corrosion can weaken the pipe and lead to leakages. If you see any rust, it's important to change the damaged area without delay to prevent further concerns.
Examine the whole size of the supply line for any kind of visible cracks, holes, or use. Also small damages can lead to water seepage, triggering your toilet to leakage continually. See to it to tighten any kind of loose connections or installations along the supply line also.
If the supply line appears to be in good condition, switch on the water and observe if there are any kind of leakages happening while the bathroom tank refills. Sometimes leakages only happen under stress, so this step is required to rule out any covert concerns.
Try to find Leakages
Examining the water line is the next action in determining and attending to any type of leaks that may be causing your commode to leak. Drip detection is vital in avoiding water wastefulness and making sure the effective upkeep of your bathroom. Begin by examining the water line for any type of indications of moisture or leaking water. Feel along the line and links for any wet areas or pools that suggest a leakage.

To effectively seek leaks, turn on the water to the bathroom and observe the supply line closely. Look for any water infiltration, especially around joints and connections. Also a tiny leakage can result in significant water loss with time, impacting both your water bill and the atmosphere via unneeded water usage.
On a regular basis evaluating the supply of water line assists in early leak detection, stopping water damages and advertising water preservation. Maintaining a leak-free toilet is not only cost-efficient yet additionally adds to ecological sustainability by minimizing water wastage.
Tighten Connections
To resolve potential leaks in your bathroom, start by making certain all links along the supply of water line are safely tightened. toilet installation cost Check the pipe links where the water line satisfies the toilet storage tank and the shut-off valve. Utilize a wrench to delicately tighten any type of loose connections. Sometimes leaks happen due to loose fittings, creating water to seep out and develop a mess.
If tightening the connections does not solve the problem, think about using sealer to the threads of the connections before reattaching them. This can help create a watertight seal and stop leaks. Make certain to use a sealer that is safe for plumbing applications and comply with the manufacturer's directions for proper application.
Check Out the Toilet Flapper
Initially, check the bathroom flapper for any indications of wear or damage. If you observe any type of leakages or damage, it's time to change the flapper. This straightforward fix can often resolve the issue of a dripping commode and assist you minimize water bills.
Examine Flapper for Leaks
You can begin by inspecting the toilet flapper for any kind of indications of leaks. Flapper maintenance is crucial for protecting against water leak in your bathroom. Inspect the flapper for any fractures, rips, or build-up that might impede it from sealing effectively. Repairing the flapper can aid recognize the source of the leak.
If you see any kind of problems with the flapper that can not be settled via maintenance, flapper substitute might be required. Flapper substitute includes uninstalling the old flapper and installing a brand-new one in its place. Validate that the brand-new flapper works with your toilet version and complies with the manufacturer's guidelines for appropriate setup.
Regularly examining and preserving the commode flapper can assist stop leaks and water wastage. By attending to any kind of flapper-related problems without delay, you can ensure that your toilet operates efficiently and efficiently. If the flapper continues to leak also after maintenance or replacement, more examination or professional assistance may be called for.
Change if Required
Inspect the toilet flapper carefully for any kind of signs of damage or put on that might indicate the requirement for substitute. If you observe fractures, deterioration, or the flapper does not seal appropriately, it's time for a replacement. When thinking about toilet substitute, cost is a considerable variable to remember. DIY repair services are typically a lot more economical than employing a specialist plumbing professional. You can purchase a brand-new bathroom flapper at your regional equipment shop for an affordable price and quickly mount it on your own adhering to the manufacturer's directions. Nevertheless, if you're uncertain or unpleasant with DIY repair services, working with a specialist may be the very best alternative. Expert fixings can guarantee the work is done appropriately and might be necessary for more complex concerns past just the flapper. Before determining whether to replace the commode flapper on your own or work with a plumbing professional, consider the expense factors to consider and your convenience degree with the repair process.
Readjust the Fill Up Shutoff
Readjusting the fill shutoff can assist quit a dripping bathroom by regulating the water level in the tank. To change the fill valve, begin by situating the valve - it's normally on the left side of the tank. Transform the modification screw clockwise to elevate the water level or counterclockwise to lower it. Make little adjustments and purge the bathroom to inspect if the concern is settled. If the water degree is still expensive or also low, you might require to change the fill shutoff.
Repairing tips consist of looking for any type of blockages in the fill shutoff that could be influencing its efficiency. Typical blunders when changing the fill valve include transforming the screw as well far in one direction, which may cause water overflow or inadequate flushing. If you're a do it yourself enthusiast, readjusting the fill shutoff is a workable task that can save you money and time contrasted to calling a plumbing technician.
Change the Wax Ring
To replace the wax ring on a leaking commode, collect the needed tools and materials prior to beginning the process. You will need a new wax ring, a putty blade, gloves, a wrench, and possibly a new set of bolts. Initially, turned off the water to the commode and flush to clear the tank. Get rid of the nuts from the screws safeguarding the toilet to the floor, thoroughly raise the commode directly, and established it aside. Scrape off the old wax ring from the flange and the bathroom base using the putty knife.
Next, position the brand-new wax ring onto the flange, ensuring it sits firmly. Reduced the commode back onto the flange, ensuring the screws align with the holes on the base. Carefully weigh down on the commode to establish the wax ring in area. Reattach the nuts and bolts, alternating sides to protect an even and tight fit. Turn the water back on, and check the bathroom for leaks. Appropriate wax ring setup is important for preventing a leaking commode.
Tighten Loose Bolts
If you discover your bathroom is leaking, one typical reason could be loose screws linking the tank to the bowl. To address this issue, start by checking the screws located at the base of the tank. Utilizing a wrench, gently tighten the screws in a crisscross pattern to assure also stress. Beware not to overtighten as this might fracture the porcelain.
If tightening the screws does not resolve the issue, you might require to ponder screw replacement. To replace the screws, beginning by switching off the water supply to the bathroom and flushing to clear the tank. Remove the old bolts and replace them with new ones, guaranteeing they are firmly tightened.
Seal Cracks and Joints
Address any type of leaks in your commode by securing splits and joints to prevent more water damages. Begin by analyzing the areas around the base of the commode and along the joints where the tank meets the dish. If you discover any kind of splits, voids, or scrubby caulk, it's important to resolve them without delay. To secure fractures properly, use a waterproof caulk suitable for washroom fixtures. Use the caulk along the cracked locations, ensuring a limited seal to prevent water from seeping with.
When it pertains to fixing joints, focus on areas where different parts of the toilet attach, such as the container bolts and the flush valve. Tighten up any loosened connections and change any type of damaged washing machines to develop a safe seal. Furthermore, examine the wax ring seal between the base of the bathroom and the floor. If it's broken or damaged, change it to stop leakages. By caulking cracks and fixing joints, you can efficiently quit water from leaking and avoid prospective water damages concerns in your bathroom.
Test for Leaks and Make Sure Appropriate Feature
Check the toilet completely to identify any type of leaks and verify that all components are functioning correctly. Look for water pooling around the base, loose links, or cracks in the tank or dish. To stop leakages, see to it that the supply of water line is tightly connected and not harmed. Additionally, take a look at the flush shutoff and flapper to validate they are securing appropriately after each flush.
To ensure correct feature and water conservation, consider carrying out maintenance suggestions such as frequently looking for and repairing leaks promptly. Setting up water-saving toilet functions like dual flush mechanisms or flexible flush shutoffs can also help reduce water usage. These features permit you to select in between a full or partial flush, conserving water with each use. Regularly check and clean up the fill valve to stop obstructions and preserve efficient water circulation.
Frequently Asked Questions
Can a Leaking Commode Reason Water Damages?
Leaking commodes can absolutely trigger water damage. Prevention techniques are vital to avoid pricey repercussions like architectural issues, mold and mildew growth, and even carcinogen. Repair work techniques have to be without delay applied to avoid additional difficulties. Disregarding a dripping bathroom can bring about extensive water damage, affecting not only your shower room yet also various other parts of your home. Stay proactive and deal with any kind of leakages quickly to avoid these harmful effects.
Exactly How Typically Should Toilet Parts Be Changed?
Toilet maintenance is vital for protecting against leaks and other problems. Routinely replacing commode parts according to a suggested timetable can assist prevent unforeseen malfunctions. Keep an eye on when different parts were last changed to assure your toilet stays in great working problem. By adhering to a replacement schedule, you can proactively deal with possible troubles prior to they escalate and conserve on your own from costly fixings in the future.
Is It Required to Shut off the Supply Of Water?
To preserve water and avoid leaks from triggering damage, it's necessary to shut off the water system when taking on any kind of pipes problems. This action is crucial for do it yourself options to be effective. By removing the water, you can stay clear of wastefulness and mess, making the repair process smoother. Keep in mind, water preservation begins with little actions like shutting off the supply when dealing with leaks.
Can a Leaking Commode Boost Water Costs?
Yes, a leaking toilet can significantly affect your water costs and total finances. Water preservation is essential to avoid unnecessary costs. Do it yourself repair work for a dripping commode can conserve you from high pipes prices. Dealing with leakages immediately is essential to stop drainage and experiencing monetary problems because of boosted expenses. Take action to take care of leakages quickly and safeguard both your pocketbook and the atmosphere.

Should I Seek Professional Aid for Commode Leaks?
If you're unclear regarding fixing toilet leakages yourself, looking for specialist aid is a wise action. Do it yourself solutions can benefit minor concerns, but intricate troubles like concealed leaks might call for experienced assistance. Common causes consist of worn-out seals or malfunctioning components. While working with a plumber may have a price connected, the time cost savings and assurance of a detailed repair are often worth it.

Public Last updated: 2024-08-05 03:12:03 AM