Fast and Clean Garage Cabinet Installation: What to Expect
If you have ever wrestled with a tangle of extension cords, holiday bins, and sports gear just to find a drill bit, you already understand the value of good storage. The best garage cabinet installations feel almost invisible. The crews arrive on time, the work area stays tidy, and by late afternoon the doors close with that muted, satisfying click that says everything is square and anchored. That kind of outcome is not an accident. It is the product of good planning, clear communication, and disciplined onsite habits from an experienced garage cabinet company.
What follows is a practical guide to what a fast and clean installation actually looks like. It draws from years of walking slabs, drilling into block, measuring around water heaters, and tuning drawer glides until they run like butter. Whether you are considering custom garage cabinets for the first time or upgrading an older system, knowing how the day unfolds helps you spot the pros, set proper expectations, and avoid common snags.
The first sign you chose the right builder
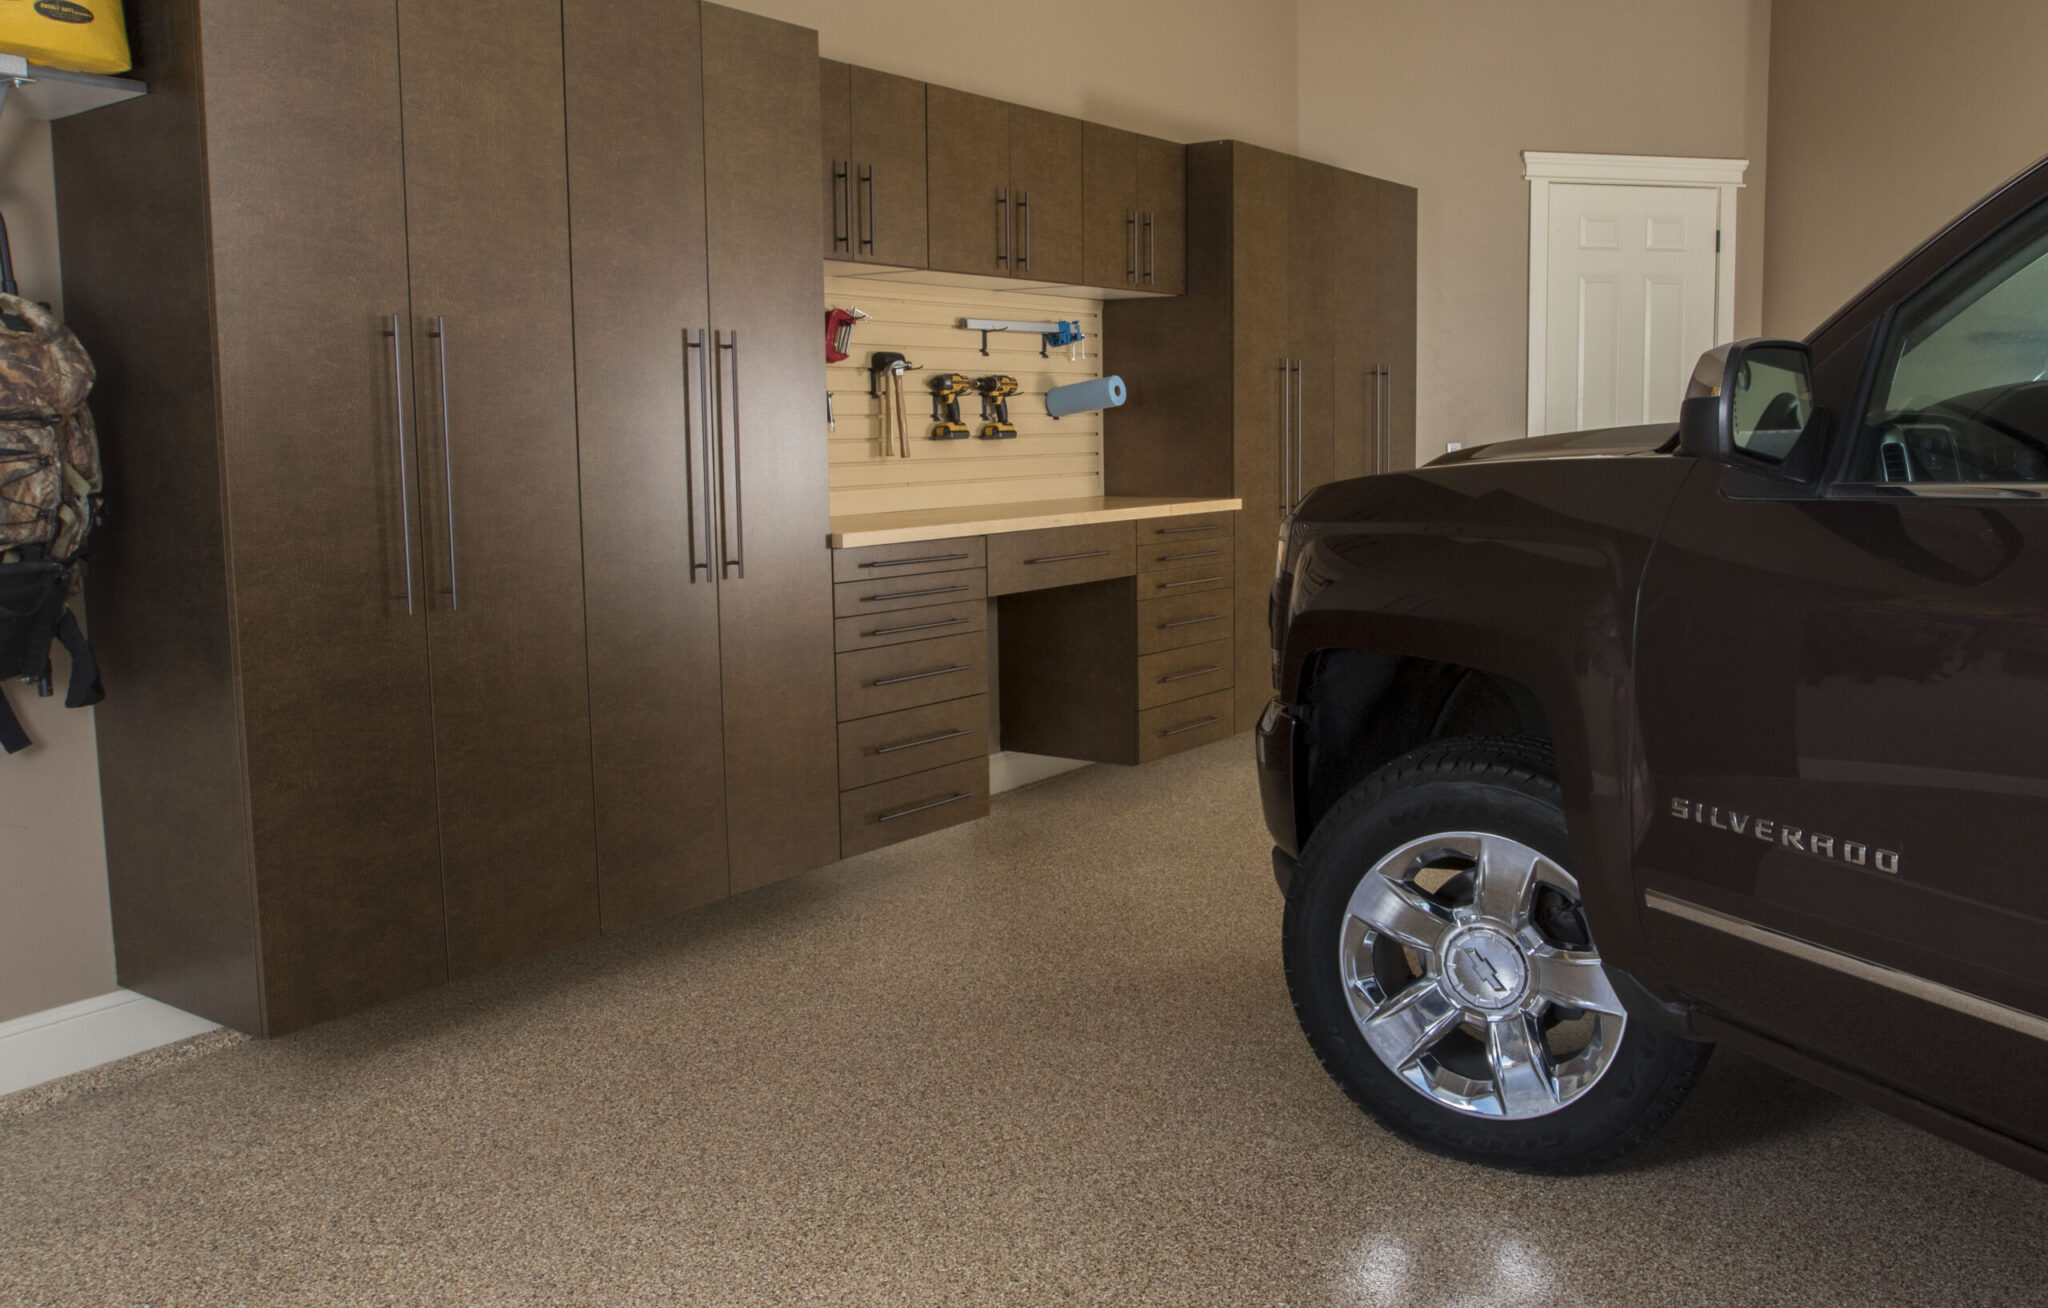
You can usually tell in the first five minutes. Professional garage cabinet builders show up in a marked vehicle, with materials wrapped or blanket protected, and introduce the crew lead by name. They do a brief walk-through, confirm the layout, and point to the exact wall anchors, fasteners, and trim they brought. You should hear language that matches the earlier design conversation: face-frame versus frameless, toe-kick or floating, full-extension slides, load capacity per shelf, and finish type. If they are working in Florida, you might also hear references to wall types like CMU block and how they plan to anchor to it. In the Orlando area, most garages are block or a mix of block and furring strips, which changes how holes get drilled and which anchors bite best.
A good crew keeps one eye on your property lines, too. That means floor protection at the entry, a drop cloth or rosin paper under the work area, and a vacuum plugged in and ready. You will also see dust control on their tools. A real garage cabinet installation kit usually includes a hammer drill, impact driver, laser, stud finder, vacuum shrouds, and at least two levels.
Pre-installation groundwork that pays off
Solid preparation shrinks installation time by hours and keeps the jobsite clean. Measurements should already be locked, with the installer having confirmed these fundamentals: ceiling height at multiple points, floor slope, wall material, outlet locations, and any obstructions. A few inches matter when you are trying to clear a garage door track or align a tall pantry next to a refrigerator or water heater.
In humid climates like Central Custom garage cabinets Florida, cabinet materials and finishes also matter. Many Garage cabinets in Orlando, FL use thermally fused laminate on moisture-resistant core or powder coated steel. Veneers and raw MDF are more sensitive to swings in humidity. If your garage sees summer peaks above 90 degrees with afternoon thunderstorms, ask how the boxes are sealed and whether the back panels allow airflow. You want a balance. A fully enclosed cabinet controls dust, but a tiny shadow gap at the wall helps air move and prevents musty corners.
If you live in a community with HOA rules, confirm that work hours and vehicle parking align with guidelines. Permit requirements are rare for storage-only installs, but if the design includes a sink, electrical additions, or wall removal, your garage cabinet company should clarify whether permits or a licensed subcontractor are involved. Straightforward cabinet-only projects do not need permits in most jurisdictions.
A simple homeowner prep that changes everything
You do not need to empty the entire garage to the driveway. You do need a clear work path and a clean wall face. A rule of thumb is to provide an 8 to 10 foot wide swath in front of the install zone for staging, cutting, and assembly. If you have a new epoxy or polyaspartic floor, warn the crew so they can use soft-wheeled dollies and avoid dragging boxes. If you have an EV charger, freezer, or water softener near the cabinet run, make sure there is space to reach shutoff valves and outlets.
Here is a short checklist that keeps day one fast and clean:
- Clear 3 to 4 feet of space from the wall where cabinets will mount.
- Move vehicles out of the garage and away from the driveway staging area.
- Remove anything on the walls in the install zone, including old hooks or wire shelves.
- Identify live utilities in the area, such as gas lines, water lines, or low-voltage wiring.
- Set aside any bins or tools you will need during the day so they are accessible.
What happens when the crew arrives
Expect a quick huddle. The crew lead confirms the drawing, verifies dimensions against reality, and checks for surprises like out-of-plumb corners or a hidden conduit. If they find more than a quarter inch of floor slope across a single cabinet run, they will choose between leveling legs, shims, or a toe-kick scribe to keep everything true.
Unboxing happens methodically. Good installers unbox near a trash can, not over your floor. They stack doors and shelves on moving blankets and stage hardware in small bins. They do not open every single box at once. They keep a clean pile of cardboard and cut it into manageable sheets for recycling.
Then the layout goes on the wall. A laser draws a cabinet top line and any reference marks. For floating systems, a ledger or steel wall rail might be installed first. Block walls get pilot holes with a carbide bit and a hammer drill. On metal stud walls, the team will widen the search for solid structure or use plywood backers. On wood studs, they use ledger screws or structural screws with proper embedment depth. Pull tests are common among better builders. They will tug the ledger hard to feel if the anchor is holding or if they have hit a soft pocket in old mortar.
Mounting to block, wood, and mixed walls
The cleanest, fastest installs lean on a standardized anchoring plan. That plan adapts to the wall type.
On CMU block, sleeve anchors, Tapcon style concrete screws, or structural sleeve bolts are typical. The key is hole quality. Blown-out block makes dust and weakens the bite of the anchor. Crews that care will drill, vacuum the hole, test fit the anchor, and then drive to torque specifications. They will not hammer fasteners into crumbling cores or ignore spalling at the surface.
On wood studs, 3 to 4 inch structural screws pull ledgers or cabinet backs tight to the wall without predrilling. Spacing usually lands at 16 inches on center. In older homes with inconsistent stud spacing, a quick scan with a magnetic finder and a small test drill pattern keeps guesswork low. If the design calls for heavy drawers full of hardware or paint cans, the installer will chase every stud they can with fasteners at the top rail.
On mixed walls, such as block below and wood above, the installer may set the system’s weight into the block with a continuous ledger and use the upper studs mainly for lateral stability. That approach is stable and neat, and it reduces visible anchors along the top of the cabinet backs.
How long the day runs
For a typical two car garage with a 16 to 20 foot wall of base and uppers, plus a tall pantry and a work surface, expect 6 to 9 hours with a two person crew. Highly customized runs, integrated slatwall, or a sink can push that to a second day. If the garage floor has just been coated, crews often add 30 minutes for extra protection and careful rolling of cabinets. Rain adds friction to unloading, but not much time to the install if staging space is available.
The fastest installs happen when the builder fabricates accurately and the jobsite is clear. Custom garage cabinets that were cut to measured heights and scribed to fit will install faster than off garage cabinet company the shelf boxes that need field surgery. That is one reason many homeowners prefer a local garage cabinet company with in-house fabrication. They measure, build, and install under one roof, so tolerances line up.
Dust control and noise expectations
Garage cabinet installation is not silent, but it does not need to be a construction site free-for-all. A crew that values cleanliness uses three tools well: a shop vacuum with a HEPA filter, a track saw or miter saw with dust collection, and a small broom for edges and corners. Drilling into block creates fine dust. You should see a helper hold the vacuum hose at the bit or use a dust shroud.
Noise peaks during demolition of old shelving and when the hammer drill meets block. If you work from home, plan your calls for late morning or mid afternoon, after layout and heavy anchoring are finished. Ear protection is standard for the crew and smart for anyone else in the garage.
Power, outlets, and work surfaces
Modern garages are doing more. Between EV chargers, freezers, pressure washers, and hobby tools, outlets need planning. If your design includes a workbench area, ask the installer to set the backsplash height to clear outlets or to coordinate a cutout for a power strip. In Orlando, many garages have GFCI outlets on the first position of the circuit. It is fine to cover an outlet with a cabinet if you do not plan to use it, but the better move is to preserve access. That keeps you from fishing cords around doors later.
If the project adds lights under the uppers, the installer may pre-drill wiring pass-throughs and mount a driver. Licensed electrical work should be pulled by an electrician, but many builders coordinate those visits so they do not slow the schedule. The cleanest look hides cords and keeps switches on the front edge, not buried behind a door.
Handling water heaters, softeners, and panels
Utilities complicate cabinet layout, but they are rarely deal breakers. A gas or electric water heater needs clearance. Code clearances vary, but even with conservative spacing you can often run storage on either side. Tankless units free up space but sometimes sit on a wall you want to use. The smart solution is a shallow cabinet or open shelf zone that jogs around the unit and keeps service lines accessible. For electrical panels, a removable back or an open recess maintains working clearance and passes inspection.
In flood-prone areas or where the garage sits lower than the house slab, a floating system that mounts cabinets above the floor prevents water wicking into the boxes. I have seen a summer storm back up a driveway and send a half inch of water across a garage floor. Floating cabinets stayed dry, and cleanup was quick.
Material choices that clean up well
For most homeowners, the choice is between laminated composite and metal. Both can look sharp and both can install cleanly. Laminated boxes with edge banding resist chipping and wipe down easily with a damp cloth. Powder coated steel adds rigidity and shrugs off moisture. The trade-off is sound and temperature. Metal can ping on impact and feel cool to the touch in winter mornings. If you store delicate tools or camera gear, a lined drawer with soft close slides in a composite box keeps vibration down.
Finish color plays into perceived cleanliness. Light grays and textured finishes hide dust better than high gloss black. If you park daily, a slightly darker toe area or a recessed toe-kick resists scuffs. Shelves rated for 75 to 100 pounds keep paint cans from bowing. Ask for the load rating by shelf and by drawer, not just a global marketing number. Ambitious homeowners will fill space they never thought they could fill. Better to plan for it.
How installers deal with uneven floors and wavy walls
Few garage slabs are perfect. Over 20 feet, a slope of 1 to 1.5 inches toward the door is normal to encourage drainage. Installers handle this in three ways. Leveling feet dial each box to a common plane and hide behind a scribed toe-kick. A continuous base platform, shimmed and leveled, supports multiple boxes and speeds the run. Floating systems mount everything off the wall at a fixed height and ignore the floor altogether, which can be the cleanest look if you like a mop under your cabinets.
Wavy walls are harder on uppers. A good crew will scribe back panels or use small spacer blocks to set a straight line. They do not over-tighten a cabinet to bend it to the wall, which can twist doors and open up seams. They set the face straight, then cover small gaps at the back with scribe trim or a slim filler.
A realistic same day timeline
Every project has its own beats, but most clean, efficient installs follow a predictable arc.
- 8:00 to 9:00 a.m.: Arrival, walkthrough, layout lines snapped or lasered, floor protection down.
- 9:00 to 11:00 a.m.: Demolition of old shelving if needed, wall prep, ledgers or rails anchored.
- 11:00 a.m. To 1:00 p.m.: Base cabinets leveled and anchored, uppers staged and hung.
- 1:00 to 3:00 p.m.: Tall cabinets set, doors and drawers installed, hardware aligned.
- 3:00 to 4:30 p.m.: Top and trim fitted, touch-ups, vacuum and wipe-down, final walkthrough.
If the job runs later, it is usually because of hidden conditions. Block that crumbles around anchors, termite damage in furring strips, or a last minute adjustment to clear a garage door arm can each add an hour. The right team explains the issue and offers the cleanest fix, not the fastest hack.
What your installer should verify before leaving
The final walkthrough matters. This is where polish shows. Doors should be aligned to even gaps, drawers should close softly without rubbing, and shelves should sit flat with pins fully seated. You should see matching end panels or finished edges at all visible sides. If there is a work surface, it should be square to the wall with even reveals at each cabinet. Ask the installer to open the doors and show the anchors or rails that carry the load. Good builders do not hide the structure.
Hardware bags and spare shelf pins should be labeled and left with you. Some garage cabinet builders keep a small kit with a quarter turn of extra screws, a touch-up marker, and a short care guide. That is not fluff. It saves a service call six months later when you adjust a door or move a shelf.
Pricing, pace, and value
Homeowners shopping for Garage cabinets in Orlando, FL will see a wide range of quotes. For a standard two car garage wall system with a mix of base, uppers, and one tall unit, a professionally supplied and installed package often lands between the mid four figures and low five figures, depending on materials, hardware, and accessories. Custom garage cabinets with thicker shelving, integrated lighting, and premium finishes move up from there. Beware of bids that look too light. Clean, fast installations cost a little more because the builder is paying for trained crews, proper anchors, and accurate fabrication.
The real value shows up a year later. Doors still hang straight, drawers still glide, and you no longer lose half a Saturday to reorganizing. The day the crew installs, you are paying for time. Over the next five years, you are buying back more of it.
How to avoid the common hiccups
A few small decisions prevent most messes and delays. If your design spans an outlet at bench height, choose a shallow cabinet or run the outlet inside a grommeted cutout in the backsplash so you can plug in tools without dangling cords. If you have a side entry door, allow a narrow filler panel next to the door casing so the cabinet handles do not bruise the trim. If your floor is freshly coated, tell the installer how old it is. Polyaspartic floors cure fast, but some epoxies stay soft for days, and a loaded cabinet can leave a permanent scar if you pivot it deeply.
In Florida, humidity pushes air and moisture through the garage daily. A tiny reveal under a toe-kick or a floating system that clears the floor by six inches lets air flow, keeps sweeping easy, and prevents mildew at the back edges. If you store paper goods or seasonal clothing, consider a sealed tall cabinet. If you store gasoline, keep it in a ventilated area away from the water heater and out of direct sun.
When custom pays off
Modular systems work well in rectangular spaces with few obstructions. Custom garage cabinets earn their keep when the ceiling height varies, the wall jogs, or you have tall items like paddleboards, golf bags, or a pressure washer to store. A cabinet maker can scribe end panels to a slope, build an extra deep pantry, or cut a notch around a window without field butchery. The fit looks intentional, and the install runs smoother because they are not forcing stock pieces into odd corners.
Custom work also shines at the bench. A work surface set to your elbow height, with a span strong enough for a bench vise, makes daily tasks easier. A pullout for a shop vacuum with a docking port saves space and keeps hose clutter under control. Those touches take more planning, but they do not have to slow the install if they are built into the design from the start.
The quiet details that keep a jobsite clean
Veteran crews do small things that you might not notice right away. They stack removed wire shelving by size and carry it out in one trip instead of shedding screws across your driveway. They open hardware bags over a bin, not the floor. They predrill hinge screws with a center bit so the heads sit flush and do not strip later. They dump the shop vac canister before it overfills and kicks dust back into the garage. They leave the last 20 minutes for wipe-downs, not last minute drilling.
One practice I like is the cardboard runway. Crews lay a strip of flattened boxes from the driveway to the install zone. Dollies roll smoother, feet stay cleaner, and that runway lifts out in seconds at the end of the day. It is simple and effective.
Final handoff and living with the system
Before the team packs up, walk the space and test how it feels. Reach for a top shelf. If it is awkward, ask about moving shelf pins or swapping a tall door for a split door in the future. Try a soft close on every drawer. If one bounces, a quick adjustment at the slide fixes it on the spot. Confirm the care guide. Most laminated finishes want only mild soap and water. Avoid harsh solvents and scouring pads. Powder coated steel wipes with a microfiber cloth and a light cleaner.
If you plan to add slatwall, bike racks, or overhead storage later, ask the installer to point out the studs or anchors behind the cabinets. A sketch or a few photos of the wall before boxes went up, with measurements from a corner, become gold later when you mount a heavy tool rack.
Choosing the right partner
The cleanest installs come from teams that own the whole process. Look for a garage cabinet company with a showroom or at least sample doors and hardware they can leave in your hands. Ask where the cabinets are fabricated and how long the lead times run. Ask to see photos of recent installs that match your wall type. In Central Florida, that often means block walls and slab floors with slope. If the builder talks comfortably about hammer drills, anchor selection, scribing, and dust control, you are on the right track.
References help, but so does a site visit if they have a project wrapping in your area. Five minutes of watching a crew work tells you more than five pages of marketing copy. Are they sweeping as they go, or wading through offcuts and screws? Are they measuring twice before drilling into your block, or guessing at layout and patching holes later? Choose the team that respects your garage as a finished space worth protecting.
The measure of a fast and clean installation is not just the clock. It is how the garage looks and feels when the truck pulls away. Floors are clean, doors are aligned, and everything is exactly where you need it. That is the difference a skilled builder makes, and it is why investing in quality garage cabinet installation pays you back, day after organized day.
Garaginization of Orlando
Address: 11245 Satellite Blvd Suite 300, Orlando, FL 32837
Phone number: (407) 676-7590
FAQ About Garage Cabinet Company
How much should garage cabinets cost?
Garage cabinets cost anywhere from $500 to $10,000+ depending on whether you choose DIY-friendly plastic/resin units, ready-to-assemble steel sets, or full custom installations. Costs scale based on the material, garage size, and whether you pay for professional installation.
Who has the best garage cabinets?
Finding the "best" garage cabinets depends on your budget and storage needs. For heavy-duty use and premium quality, NewAge Products is widely considered the best overall. For excellent mid-tier value, Gladiator is highly rated, while Husky provides the best budget-friendly metal options.
Is Garage Organization.com legit?
Yes, Garage-Organization.com is a legit e-commerce retailer that sells garage storage cabinets, shelving, and organizational systems. While they are a legitimate business, there are a few important things to know before you buy.

Public Last updated: 2026-06-21 08:11:32 PM