Enhancing the Beauty and Durability of Your Home with Stone Veneer Around Windows
Stone veneer is a popular choice for homeowners looking to add a touch of elegance and sophistication to their homes. When it comes to enhancing the beauty and durability of a home, one area that often gets overlooked is the space around windows. Stone veneer around windows can transform the look of a home, adding character and charm while also providing protection from the elements. In this article, we will explore the benefits, design options, installation process, and maintenance tips for stone veneer around windows.
Benefits of Stone Veneer Around Windows
There are several benefits to adding stone veneer around windows in a home. One of the primary advantages is the aesthetic appeal it brings to the exterior of the house. Stone veneer has a timeless and classic look that can enhance the overall curb appeal of a home. It adds a sense of luxury and sophistication that can elevate the design of any house.
In addition to its visual appeal, stone veneer is also highly durable and long-lasting. It can withstand harsh weather conditions, including rain, snow, and extreme temperatures, making it a practical choice for areas with variable climates. Stone veneer is also resistant to pests, rot, and mold, which can help protect the structural integrity of the home.
Another benefit of stone veneer around windows is its versatility in design. There are a wide variety of stone types, colors, and textures available, allowing homeowners to customize the look of their windows to suit their personal style and the architectural design of the house. Whether you prefer a modern, rustic, or traditional look, there is a stone veneer option to complement any aesthetic.
Design Options for Stone Veneer Around Windows
When it comes to designing stone veneer around windows, there are several options to consider. The choice of stone type, color, and texture can greatly impact the overall look and feel of the home. Here are some popular design options for stone veneer around windows:
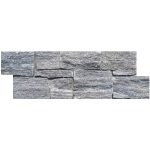
1. Natural Stone Veneer: Natural stone veneer is made from real stone quarried from the earth. It offers a unique and authentic look, with variations in color and texture that add depth and character to the windows. Popular natural stone options include limestone, slate, granite, and travertine.
2. Manufactured https://www.fs-slate.com/roofing-slate/ : Manufactured stone veneer is a more affordable alternative to natural stone, made from a mixture of cement, aggregates, and iron oxides. It is designed to mimic the look of natural stone and is available in a wide range of colors and textures. Manufactured stone veneer is lightweight and easy to install, making it a popular choice for homeowners.
3. Stacked Stone Veneer: Stacked stone veneer features stones that are stacked on top of each other to create a textured and rustic look. This style is often used to add a touch of warmth and charm to the exterior of a home. Stacked stone veneer is available in various shapes and sizes, allowing for creative and customizable designs around windows.
4. Fieldstone Veneer: Fieldstone veneer is a type of natural stone that has a rough and irregular shape, giving it a natural and rustic appearance. Fieldstone veneer is often used to create a more organic and weathered look around windows, adding a touch of character and authenticity to the home.
5. Limestone Veneer: Limestone veneer is a popular choice for homeowners looking to achieve a classic and elegant look around windows. Limestone has a smooth and uniform texture, with a soft color palette that complements a wide range of architectural styles. Limestone veneer is versatile and timeless, making it a popular choice for many homeowners.
Installation Process for Stone Veneer Around Windows
The installation process for stone veneer around windows requires careful planning and attention to detail to ensure a successful and long-lasting result. Here are the basic steps involved in installing stone veneer around windows:
1. Prepare the Surface: Before installing stone veneer, the surface around the windows must be properly prepared. This involves cleaning the area and ensuring that it is free of dirt, debris, and any loose materials. If necessary, a moisture barrier may be applied to protect the underlying structure from water damage.
2. Measure and Cut the Stone: Measure the dimensions of the windows and cut the stone veneer to fit around them. Use a saw or chisel to cut the stone to the desired shape and size, ensuring a precise fit around the windows.
3. Apply Adhesive: Apply a high-quality construction adhesive to the back of the stone veneer and press it firmly onto the surface around the windows. Make sure to apply the adhesive evenly and in a consistent thickness to ensure a secure bond.
4. Secure the Stone: Use screws or nails to secure the stone veneer in place while the adhesive sets. This will help prevent the stone from shifting or moving during the installation process. Be sure to follow the manufacturer's guidelines for fastening the stone veneer securely.
5. Grout the Joints: Once the stone veneer is in place, fill in the joints between the stones with grout to create a seamless and polished look. Choose a grout color that complements the stone veneer to enhance the overall aesthetic appeal of the windows.
6. Seal the Stone: To protect the stone veneer from moisture, stains, and damage, apply a sealer to the surface. The sealer will help maintain the appearance of the stone and prolong its lifespan, ensuring that it remains beautiful and durable for years to come.
Maintenance Tips for Stone Veneer Around Windows
Proper maintenance is essential to keep stone veneer around windows looking its best and functioning effectively. Here are some maintenance tips to help preserve the beauty and durability of stone veneer:
1. Regular Cleaning: Clean the stone veneer around windows regularly to remove dirt, dust, and debris that can accumulate over time. Use a mild detergent and water solution to gently scrub the surface and rinse thoroughly with clean water.
2. Inspect for Damage: Periodically inspect the stone veneer for any signs of damage, such as cracks, chips, or loose stones. Repair any damage promptly to prevent further deterioration and maintain the structural integrity of the stone veneer.
3. Sealant Application: Reapply a sealer to the stone veneer around windows as needed to protect the surface from moisture and stains. Follow the manufacturer's guidelines for the proper application of the sealer to ensure maximum effectiveness.
4. Trim Vegetation: Trim back any vegetation or landscaping near the windows to prevent overgrowth that can damage the stone veneer. Ensure that plants are kept at a safe distance to maintain the integrity of the installation.
5. Professional Inspection: Schedule a professional inspection of the stone veneer around windows periodically to assess its condition and identify any potential issues. A professional can recommend repairs or maintenance tasks to keep the stone veneer in optimal condition.
In conclusion, stone veneer around windows is a versatile and durable option for enhancing the beauty and durability of a home. With a wide range of design options, easy installation process, and simple maintenance requirements, stone veneer is a practical choice for homeowners looking to elevate the aesthetic appeal of their windows. By choosing the right stone type, color, and texture, and following proper installation and maintenance practices, homeowners can enjoy the timeless elegance and lasting beauty of stone veneer around windows for years to come.
Benefits of Stone Veneer Around Windows
There are several benefits to adding stone veneer around windows in a home. One of the primary advantages is the aesthetic appeal it brings to the exterior of the house. Stone veneer has a timeless and classic look that can enhance the overall curb appeal of a home. It adds a sense of luxury and sophistication that can elevate the design of any house.
In addition to its visual appeal, stone veneer is also highly durable and long-lasting. It can withstand harsh weather conditions, including rain, snow, and extreme temperatures, making it a practical choice for areas with variable climates. Stone veneer is also resistant to pests, rot, and mold, which can help protect the structural integrity of the home.
Another benefit of stone veneer around windows is its versatility in design. There are a wide variety of stone types, colors, and textures available, allowing homeowners to customize the look of their windows to suit their personal style and the architectural design of the house. Whether you prefer a modern, rustic, or traditional look, there is a stone veneer option to complement any aesthetic.
Design Options for Stone Veneer Around Windows
When it comes to designing stone veneer around windows, there are several options to consider. The choice of stone type, color, and texture can greatly impact the overall look and feel of the home. Here are some popular design options for stone veneer around windows:
1. Natural Stone Veneer: Natural stone veneer is made from real stone quarried from the earth. It offers a unique and authentic look, with variations in color and texture that add depth and character to the windows. Popular natural stone options include limestone, slate, granite, and travertine.
2. Manufactured https://www.fs-slate.com/roofing-slate/ : Manufactured stone veneer is a more affordable alternative to natural stone, made from a mixture of cement, aggregates, and iron oxides. It is designed to mimic the look of natural stone and is available in a wide range of colors and textures. Manufactured stone veneer is lightweight and easy to install, making it a popular choice for homeowners.
3. Stacked Stone Veneer: Stacked stone veneer features stones that are stacked on top of each other to create a textured and rustic look. This style is often used to add a touch of warmth and charm to the exterior of a home. Stacked stone veneer is available in various shapes and sizes, allowing for creative and customizable designs around windows.
4. Fieldstone Veneer: Fieldstone veneer is a type of natural stone that has a rough and irregular shape, giving it a natural and rustic appearance. Fieldstone veneer is often used to create a more organic and weathered look around windows, adding a touch of character and authenticity to the home.
5. Limestone Veneer: Limestone veneer is a popular choice for homeowners looking to achieve a classic and elegant look around windows. Limestone has a smooth and uniform texture, with a soft color palette that complements a wide range of architectural styles. Limestone veneer is versatile and timeless, making it a popular choice for many homeowners.
Installation Process for Stone Veneer Around Windows
The installation process for stone veneer around windows requires careful planning and attention to detail to ensure a successful and long-lasting result. Here are the basic steps involved in installing stone veneer around windows:
1. Prepare the Surface: Before installing stone veneer, the surface around the windows must be properly prepared. This involves cleaning the area and ensuring that it is free of dirt, debris, and any loose materials. If necessary, a moisture barrier may be applied to protect the underlying structure from water damage.
2. Measure and Cut the Stone: Measure the dimensions of the windows and cut the stone veneer to fit around them. Use a saw or chisel to cut the stone to the desired shape and size, ensuring a precise fit around the windows.
3. Apply Adhesive: Apply a high-quality construction adhesive to the back of the stone veneer and press it firmly onto the surface around the windows. Make sure to apply the adhesive evenly and in a consistent thickness to ensure a secure bond.
4. Secure the Stone: Use screws or nails to secure the stone veneer in place while the adhesive sets. This will help prevent the stone from shifting or moving during the installation process. Be sure to follow the manufacturer's guidelines for fastening the stone veneer securely.
5. Grout the Joints: Once the stone veneer is in place, fill in the joints between the stones with grout to create a seamless and polished look. Choose a grout color that complements the stone veneer to enhance the overall aesthetic appeal of the windows.
6. Seal the Stone: To protect the stone veneer from moisture, stains, and damage, apply a sealer to the surface. The sealer will help maintain the appearance of the stone and prolong its lifespan, ensuring that it remains beautiful and durable for years to come.
Maintenance Tips for Stone Veneer Around Windows
Proper maintenance is essential to keep stone veneer around windows looking its best and functioning effectively. Here are some maintenance tips to help preserve the beauty and durability of stone veneer:
1. Regular Cleaning: Clean the stone veneer around windows regularly to remove dirt, dust, and debris that can accumulate over time. Use a mild detergent and water solution to gently scrub the surface and rinse thoroughly with clean water.
2. Inspect for Damage: Periodically inspect the stone veneer for any signs of damage, such as cracks, chips, or loose stones. Repair any damage promptly to prevent further deterioration and maintain the structural integrity of the stone veneer.
3. Sealant Application: Reapply a sealer to the stone veneer around windows as needed to protect the surface from moisture and stains. Follow the manufacturer's guidelines for the proper application of the sealer to ensure maximum effectiveness.
4. Trim Vegetation: Trim back any vegetation or landscaping near the windows to prevent overgrowth that can damage the stone veneer. Ensure that plants are kept at a safe distance to maintain the integrity of the installation.
5. Professional Inspection: Schedule a professional inspection of the stone veneer around windows periodically to assess its condition and identify any potential issues. A professional can recommend repairs or maintenance tasks to keep the stone veneer in optimal condition.
In conclusion, stone veneer around windows is a versatile and durable option for enhancing the beauty and durability of a home. With a wide range of design options, easy installation process, and simple maintenance requirements, stone veneer is a practical choice for homeowners looking to elevate the aesthetic appeal of their windows. By choosing the right stone type, color, and texture, and following proper installation and maintenance practices, homeowners can enjoy the timeless elegance and lasting beauty of stone veneer around windows for years to come.

Public Last updated: 2025-04-28 02:56:06 AM